I recently bought a second hand 27" monitor for my home office (a Philips 272P4). I knew it wouldn't be like the retina screen on my MacBook Pro, or the Apple monitor at work. But after connecting it to my computer the picture quality was horrible. It was most obvious when rendering text. Jagged edges, halo effects - you name it.
At first I thought it might be the cable - HDMI, the only one I could find at home. Maybe using a displayport cable would fix it... (Hint: no).
I fiddled with the picture settings on the monitor for a long time to no avail. I tried calibrating it using the built-in MacOS calibration. Didn't help. I change color profiles. That didn't help either.
Finally I found a couple of interesting forum posts and blog posts that said the same: MacBooks are notorious for identifying non-Apple monitors as TVs and assigning them YCbCr as a color space instead of RGB. The result is pretty much what I described above - horrible picture quality and especially horrible font rendering.
So how to fix it?
Changing color profile will not help (even to one with RGB in the name). Actually, nothing you can simply do in Systems Settings or any UI in MacOS will fix it.
This is the only solution I've found, and I warn you - it's not for the faint at heart:
#!/usr/bin/ruby
# Create display override file to force Mac OS X to use RGB mode for Display
# see http://embdev.net/topic/284710
#
# Update 2013-06-24: added -w0 option to prevent truncated lines

require 'base64'

data=`ioreg -l -w0 -d0 -r -c AppleDisplay`

edid_hex=data.match(/IODisplayEDID.*?<([a-z0-9]+)>/i)[1]
vendorid=data.match(/DisplayVendorID.*?([0-9]+)/i)[1].to_i
productid=data.match(/DisplayProductID.*?([0-9]+)/i)[1].to_i

puts "found display: vendorid #{vendorid}, productid #{productid}, EDID:\n#{edid_hex}"

bytes=edid_hex.scan(/../).map{|x|Integer("0x#{x}")}.flatten

puts "Setting color support to RGB 4:4:4 only"
bytes[24] &= ~(0b11000)

puts "Number of extension blocks: #{bytes[126]}"
puts "removing extension block"
bytes = bytes[0..127]
bytes[126] = 0

bytes[127] = (0x100-(bytes[0..126].reduce(:+) % 256)) % 256
puts
puts "Recalculated checksum: 0x%x" % bytes[127]
puts "new EDID:\n#{bytes.map{|b|"%02X"%b}.join}"

Dir.mkdir("DisplayVendorID-%x" % vendorid) rescue nil
f = File.open("DisplayVendorID-%x/DisplayProductID-%x" % [vendorid, productid], 'w')
f.write '<?xml version="1.0" encoding="UTF-8"?>
<!DOCTYPE plist PUBLIC "-//Apple//DTD PLIST 1.0//EN" "http://www.apple.com/DTDs/PropertyList-1.0.dtd">
<plist version="1.0">'
f.write "
<dict>
  <key>DisplayProductName</key>
  <string>Display with forced RGB mode (EDID override)</string>
  <key>IODisplayEDID</key>
  <data>#{Base64.encode64(bytes.pack('C*'))}</data>
  <key>DisplayVendorID</key>
  <integer>#{vendorid}</integer>
  <key>DisplayProductID</key>
  <integer>#{productid}</integer>
</dict>
</plist>"
f.close- Copy the Ruby code above into a file and save it somewhere you'll find it. How about
~/Downloads/fix.rb? - Put your Mac in clamshell mode, that is with the lid closed but the external monitor active. To activate clamshell mode, attach the power adapter and close the lid. When the Mac tries to go to sleep press any key on an external keyboard (USB or Bluetooth). This should reactivate the external monitor. It is important that the external monitor is the only monitor attached when running the script.
- Open a terminal and become root:
:~>sudo su - root - Go to where your file is:
:~>d /Users/yourusername/Downloads - Run the script:
:~>ruby fix.rb. Make note of the name of the folder that's created. It's going to be something likeDisplayVendorID-10ac/(the last part differs with every monitor). If you didn't manage to activate clamshell mode in step 2 you will get multiple folders (one per monitor) and the joy of trying to decipher which one belongs to the external monitor. - With SIP (System Integrity Protection) enabled even root cannot write to /System where we need this new folder to go. So SIP needs to be disabled temporarily. Be careful when doing this, by disabling network connections for instance. Reboot your Mac into recovery mode by selecting restart in the Apple menu and holding CMD+R.
- In recovery mode, start a new terminal from the menu.
- Run the command
:~>csrutil disable. - Reboot into regular mode and log in as your user.
- Start a terminal, become root (see 3. above) and cd to ~/Downloads.
- Catalina update! Even with SIP off, protected system files are now mounted as read only and can only be updated by black magic inside MacOS. You can sidestep this by remounting the drive as read/write:
:~>mount -uw / - Move the generated folder:
:~>mv DisplayVendorID-10ac/ /System/Library/Displays/Contents/Resources/Overrides. - Reboot your Mac and log in as your regular user.
- Behold the wonder that is RGB mode and your fonts not looking like crap anymore. I almost cried.
- You are not done. You need to reenable SIP. Reboot your Mac in recovery mode (see 6. above).
- Start a terminal and run
:~>csrutil enable. - Reboot into regular mode.
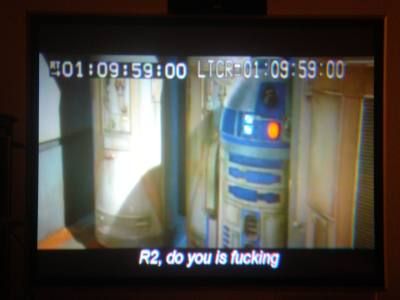
In just 16 simple steps including only five reboots your computer is now behaving as you kind of could have expected from the get go and not like:
This blog post is not really my original work as much as a merged and edit version of these two posts:
Connecting a Dell UltraSharp U3014 to a Mac, ugh by some unknown author
Force RGB mode in Mac OS X to fix the picture quality of an external monitor by Matthew Inkson